It's another Saturday Night Special over at Funky Junk.
This is the 10th edition and it's growing more and more popular every week. Its a party where the creative kind stop in to show you what they've been making. It's a great place to get fabulous ideas, so head on over there and have a look around when you're finished here.
I'm packing up my house to move, and I have no right stopping to make art projects, but I did anyway. I missed being a part of that party because so many great projects show up over there each weekend., so as I was trying to organize my workroom to ready it for packing I ran across these, and I figured "Why not?".
These were so quick to do, and they can be applied to any art where you love the frame but not the picture.
Here are the finished pieces:
Click on any of the pictures in this post to enlarge.
Click on any of the pictures in this post to enlarge.
And here's how I got there:
I started with these pieces I picked up from TJMaxx a couple of years ago. I loved the look of the frames on the stands, but didn't like the center part. I knew I could easily change them, so I bought the three they had left and put them in my "SOMEDAY" pile. Someday happened in the middle of the night last night.
Then I scavenged my workroom to see what kind of adornements I could come up with. I thought about making them a set of three matching pieces, but then knowing I would be selling them on Etsy, I thought it best to make three different ones.
I pulled together some pretty scrapbook paper, some fabric, buttons, and a few things from this wall.
I cut the papers to fit only the center part of the frame where the wording was and coated the back with my new FAVORITE paper glue, which is Scotch Quick-Dry Adhesive. (Can be found in the scrapbook section at your local craft store. You can use it on paper, metal, and plastic. It sets up really quick so there's not much working time when you're playing with paper.)
I very gently smoothed the paper onto the frame. I found that it's best to put the glue on the piece you're applying rather than the piece your'e applying it to. It makes the paper easier to manipulate.
Prettier already, huh?
Then I tried laying out several different craft parts to see what looked the best. I started with the grand idea that I would use keys on them, but for some reason the keys I thought I'd be using didn't stand out enough from the papers.
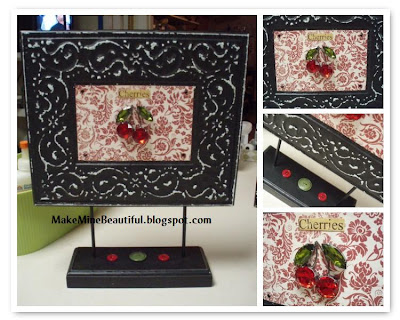
So I resorted back to my "TREATS WALL" (as I call it), and began laying things out again. Here's the first one.
I used a Cherry Pin (clipping the shank off the back), the word "Cherries" cut from an old calendar, some Hot Glitz Rhinestones in the corners, and a few buttons on the bottom. I love it!
For the next one, I made a little bird template and cut it out in fabric. I glued the fabric one with my fav glue. It worked perfectly! I added a Hot Glitz Rhinestone for the eye, and I cut the shank off the back of a cute button and glued it to the wing for a little added detail. I did the same thing to a few more buttons and glued them on the base. For the buttons I used another great glue I just discovered from the Martha Stewart Create line. It's in a clear tube and it just says "permanent glue". A woman at the store told me it was great for metal pieces, and she was right. (And I love that the tip screws on, not pops on, because it keeps the glue from gumming up and drying on the tip.)
SIDE NOTE: If you want this little bird template for yourself, right click on this picture and print it. If you need it larger, just put it on your printer and enlarge it, print it again, and then cut it out of paper. Make the bird and the wing separate. I printed this one out to test it and it's a good size for most craft projects.
(I had to decrease the size of the pic I had posted because it cut off the tail once it was posted.)
I also used it here, only I made him a little plumper to fit the scale of the mitten:
Oops, I'm getting off track here.
Here's the last picture frame. I really wanted to use a set of keys, but the ones I had in mind didn't fit the bill. I had these saved to use as a gift tag so I decided to use them on this instead.
All I used on this one was a set of keys and a collection of buttons.
This one is so pretty in person. I love the red, pink, and teal mix of colors.
On the bottom, I put a blue button shaped like a flower in the middle. When I was finished, it just looked too plain, so I dropped a ball of glue in it and tossed in a few tiny beads. I can't seem to get a good picture of it, but trust me, it's darling.
So there you have it.................the easiest, quickest art transformation ever!
And if you'd like to have one of these, head on up to the top right side of this page and click 'practicalfnthings' at the bottom of my EtsyMini.
I'm selling these for $29 each, and I'm giving FREE SHIPPING through the end of the year to the US!!


No comments:
Post a Comment